Updating U-Boot and SPL on the StarFive VisionFive 2
Embracing the Future with RISC-V Architecture

Software Engineer and Team Leader with a robust background in CI/CD, automation, developer tooling and proven problem-solving expertise. Committed to combining technical knowledge with a product management mindset to drive goals and product improvements during the development process. Consistent record of achievement building and integrating automation to facilitate seamless CI/CD pipelines, leading to improved time-to-market.
Ubuntu's recent foray into providing developer preview images for the emerging RISC-V architecture marks an exciting development for RISC-V enthusiasts. This is particularly true for those experimenting with popular supported development boards such as the StarFive VisionFive 2.
The prospect of running Ubuntu, or the latest Debian versions provided directly by StarFive, hinges critically on having the latest U-Boot and SPL firmware on these boards. However, working through the update process can be a challenge due to fragmented and sometimes confusing documentation.
So, if you are excited about running the latest operating systems on your VisionFive 2 board, then you are in the right place! In this post, I aim to demystify this process, offering a guide on updating your board's firmware through the most reliable methods, whether you're a seasoned tinkerer or a curious hobbyist exploring the potential of RISC-V architecture.
🔍 A Primer on U-Boot and SPL
Feel free to skip over this section if you are just here to update the firmware!
Before diving into the firmware update process, let's take a look at what U-Boot and SPL are and their roles in the VisionFive 2 board.
In the context of the VisionFive 2 board, U-Boot acts as the universal bootloader, a critical piece of software that orchestrates the booting process. It initialises the board's hardware, such as CPU and memory, and sets up the necessary environment for the OS to run. U-Boot is highly versatile, allowing for a variety of boot mediums and providing a rich set of commands for configuration and diagnostics via a serial console, making it an essential tool for developers.
Complementing U-Boot is the Secondary Program Loader (SPL), which is the minimalistic first-stage bootloader that takes action immediately after the board is powered on. The SPL's role is to perform the fundamental hardware initialisations and to prepare the system so that the more comprehensive U-Boot can take over the process.
This two-stage boot process ensures that the VisionFive 2 can handle the complex boot scenarios required by modern computing environments while maintaining the flexibility and robustness needed for the development and deployment of various applications on this RISC-V platform.
🤔 Which Method Should We Use?
We will use the SD Card image method to update the board. While there are other methods to update the firmware, the SD Card image method is preferred due to its reliability and simplicity.
In most cases, if you have not updated the board's firmware, then the latest version of StarFive's Debian release, nor Ubuntu, will even boot in the first place.
You should also use this method if you are trying to use the flashcp command method and hit the u-boot-spl.bin.normal.out won’t fit into /dev/mtd0! error message.
📋 Prerequisites
Hardware you will need:
A MicroSD card (any size 1GB or more should work)
A USB flash drive
USB to UART dongle (optional, but required if you want to run Ubuntu later)
Grab the latest version of the following files from the VisionFive2 Firmware Repo:
u-boot-spl.bin.normal.out- put this on the USB flash drivevisionfive2_fw_payload.img- put this on the USB flash drivesdcard.img- flash this to the MicroSD card using Etcher
⚒️ Hardware Setup
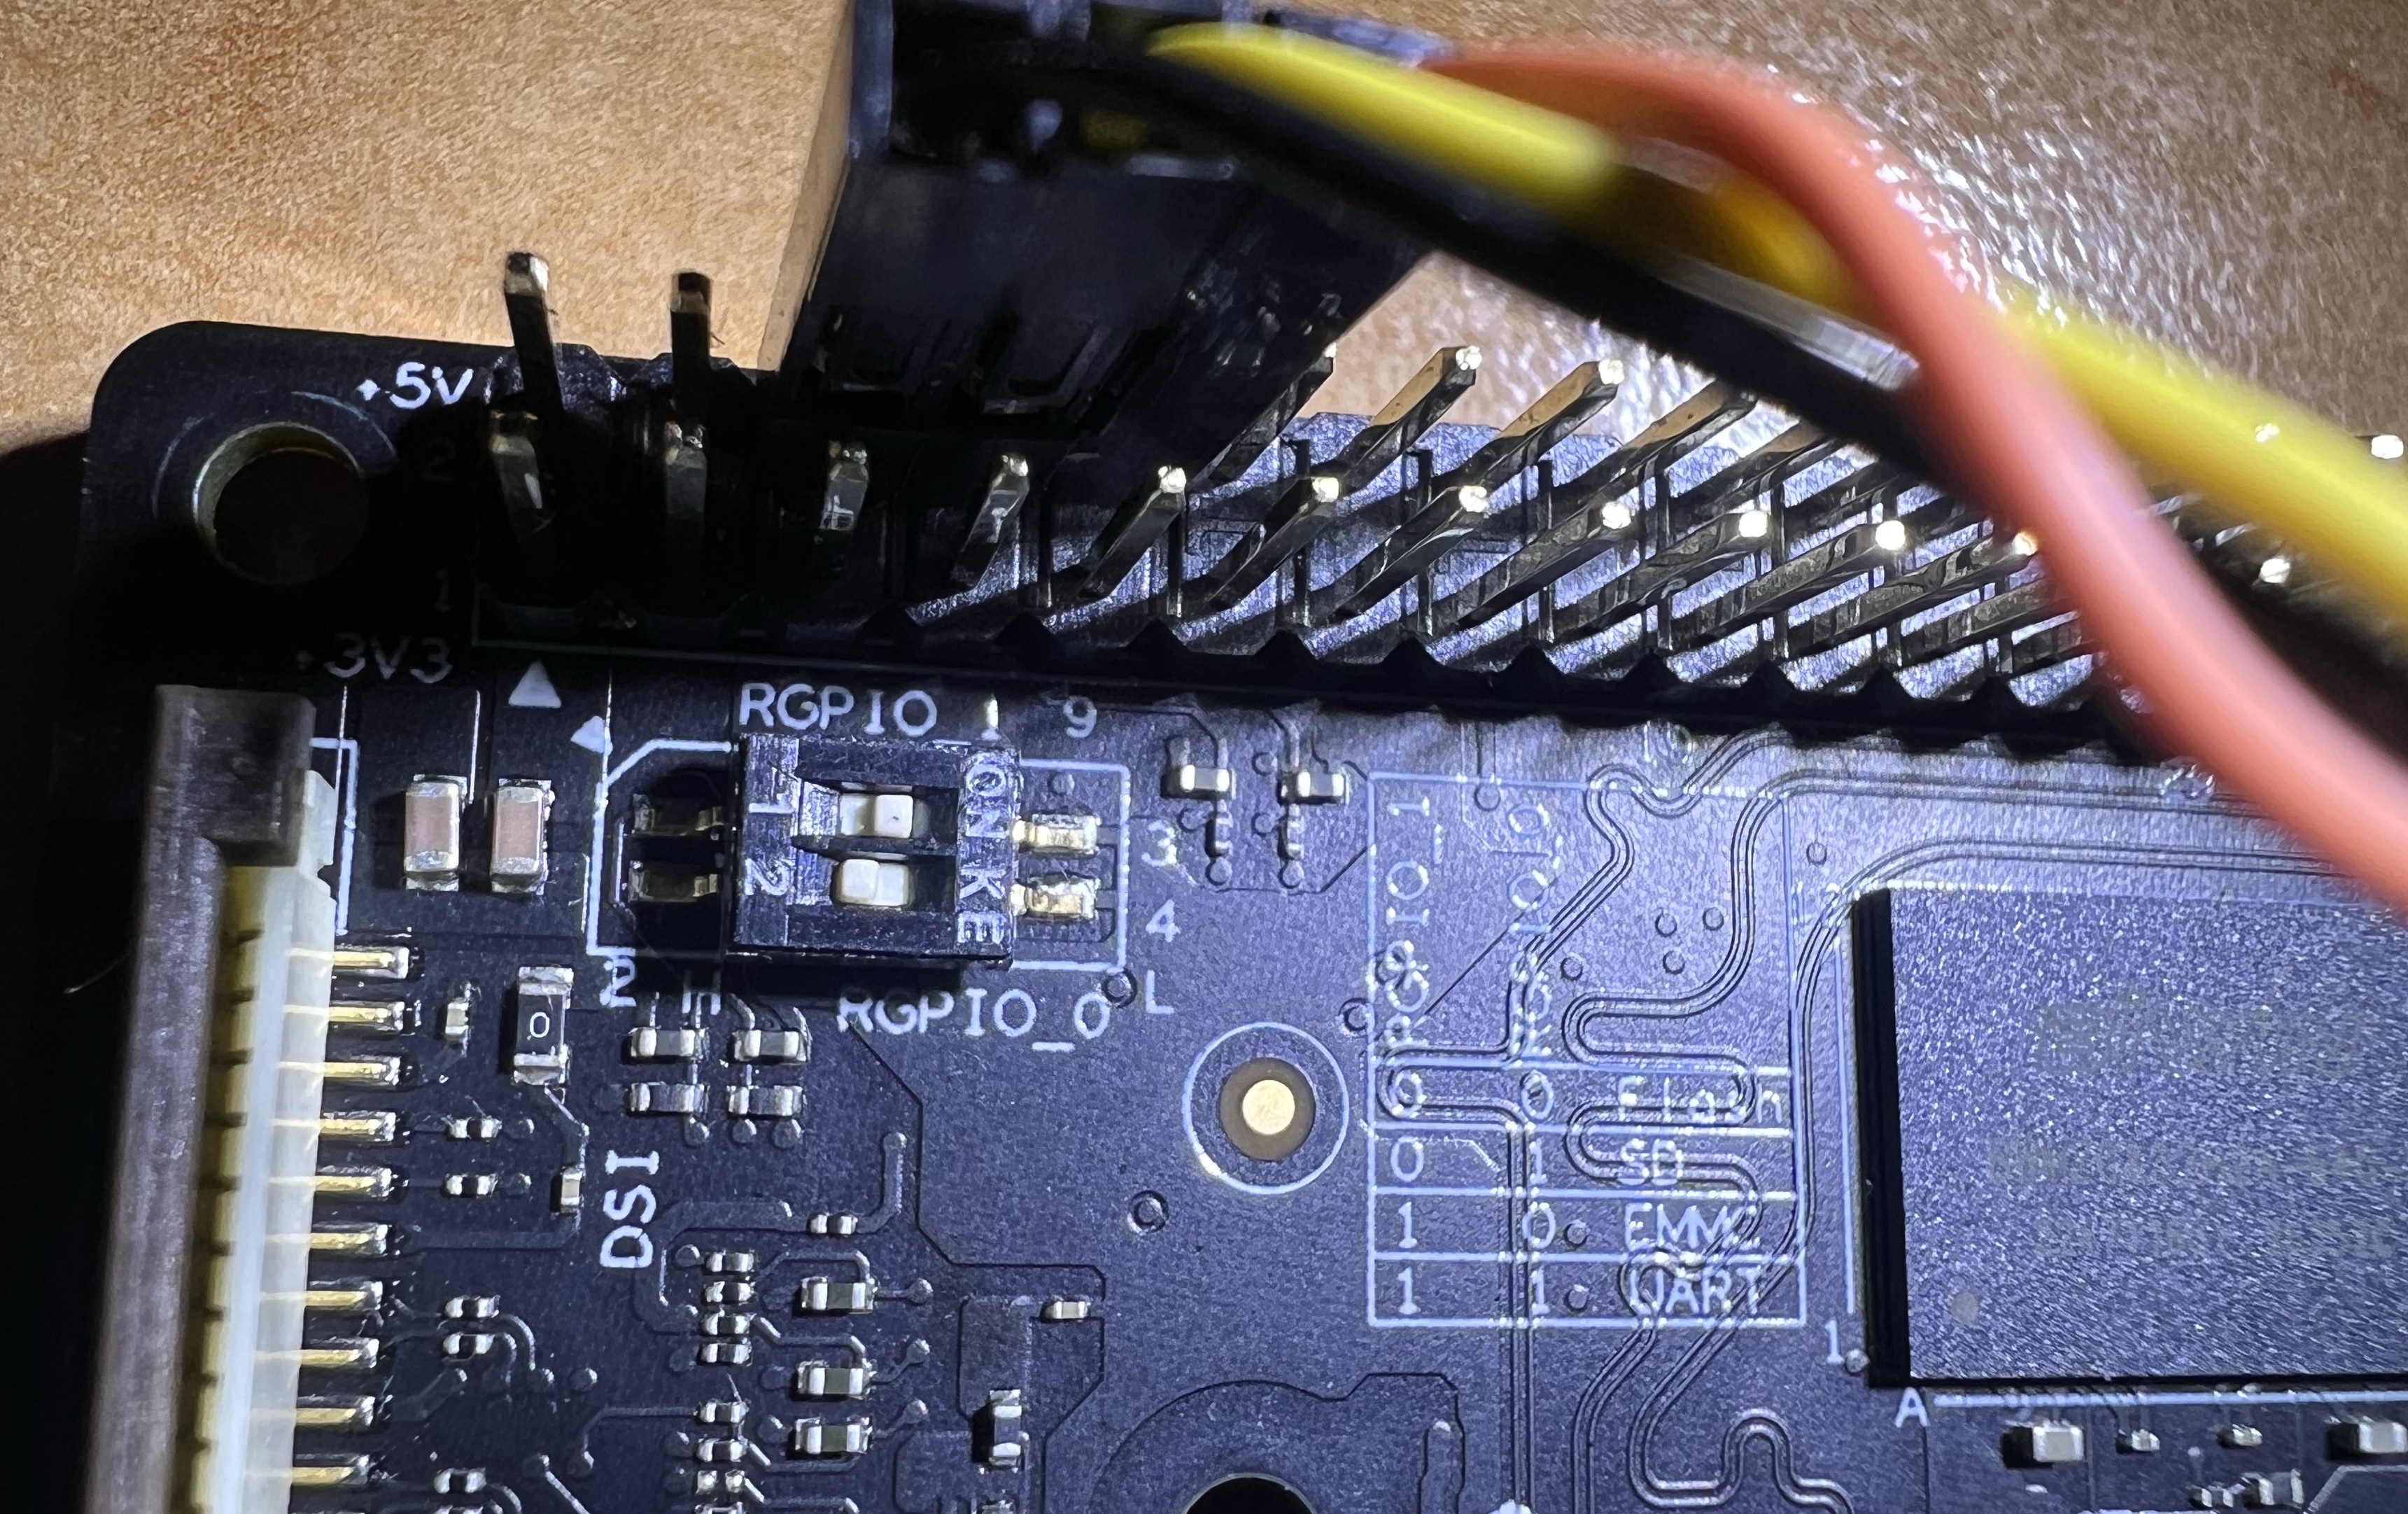
Set the DIP switches to set the Boot Mode to SDIO
RGPIO_1-> 0RGPIO_0-> 1
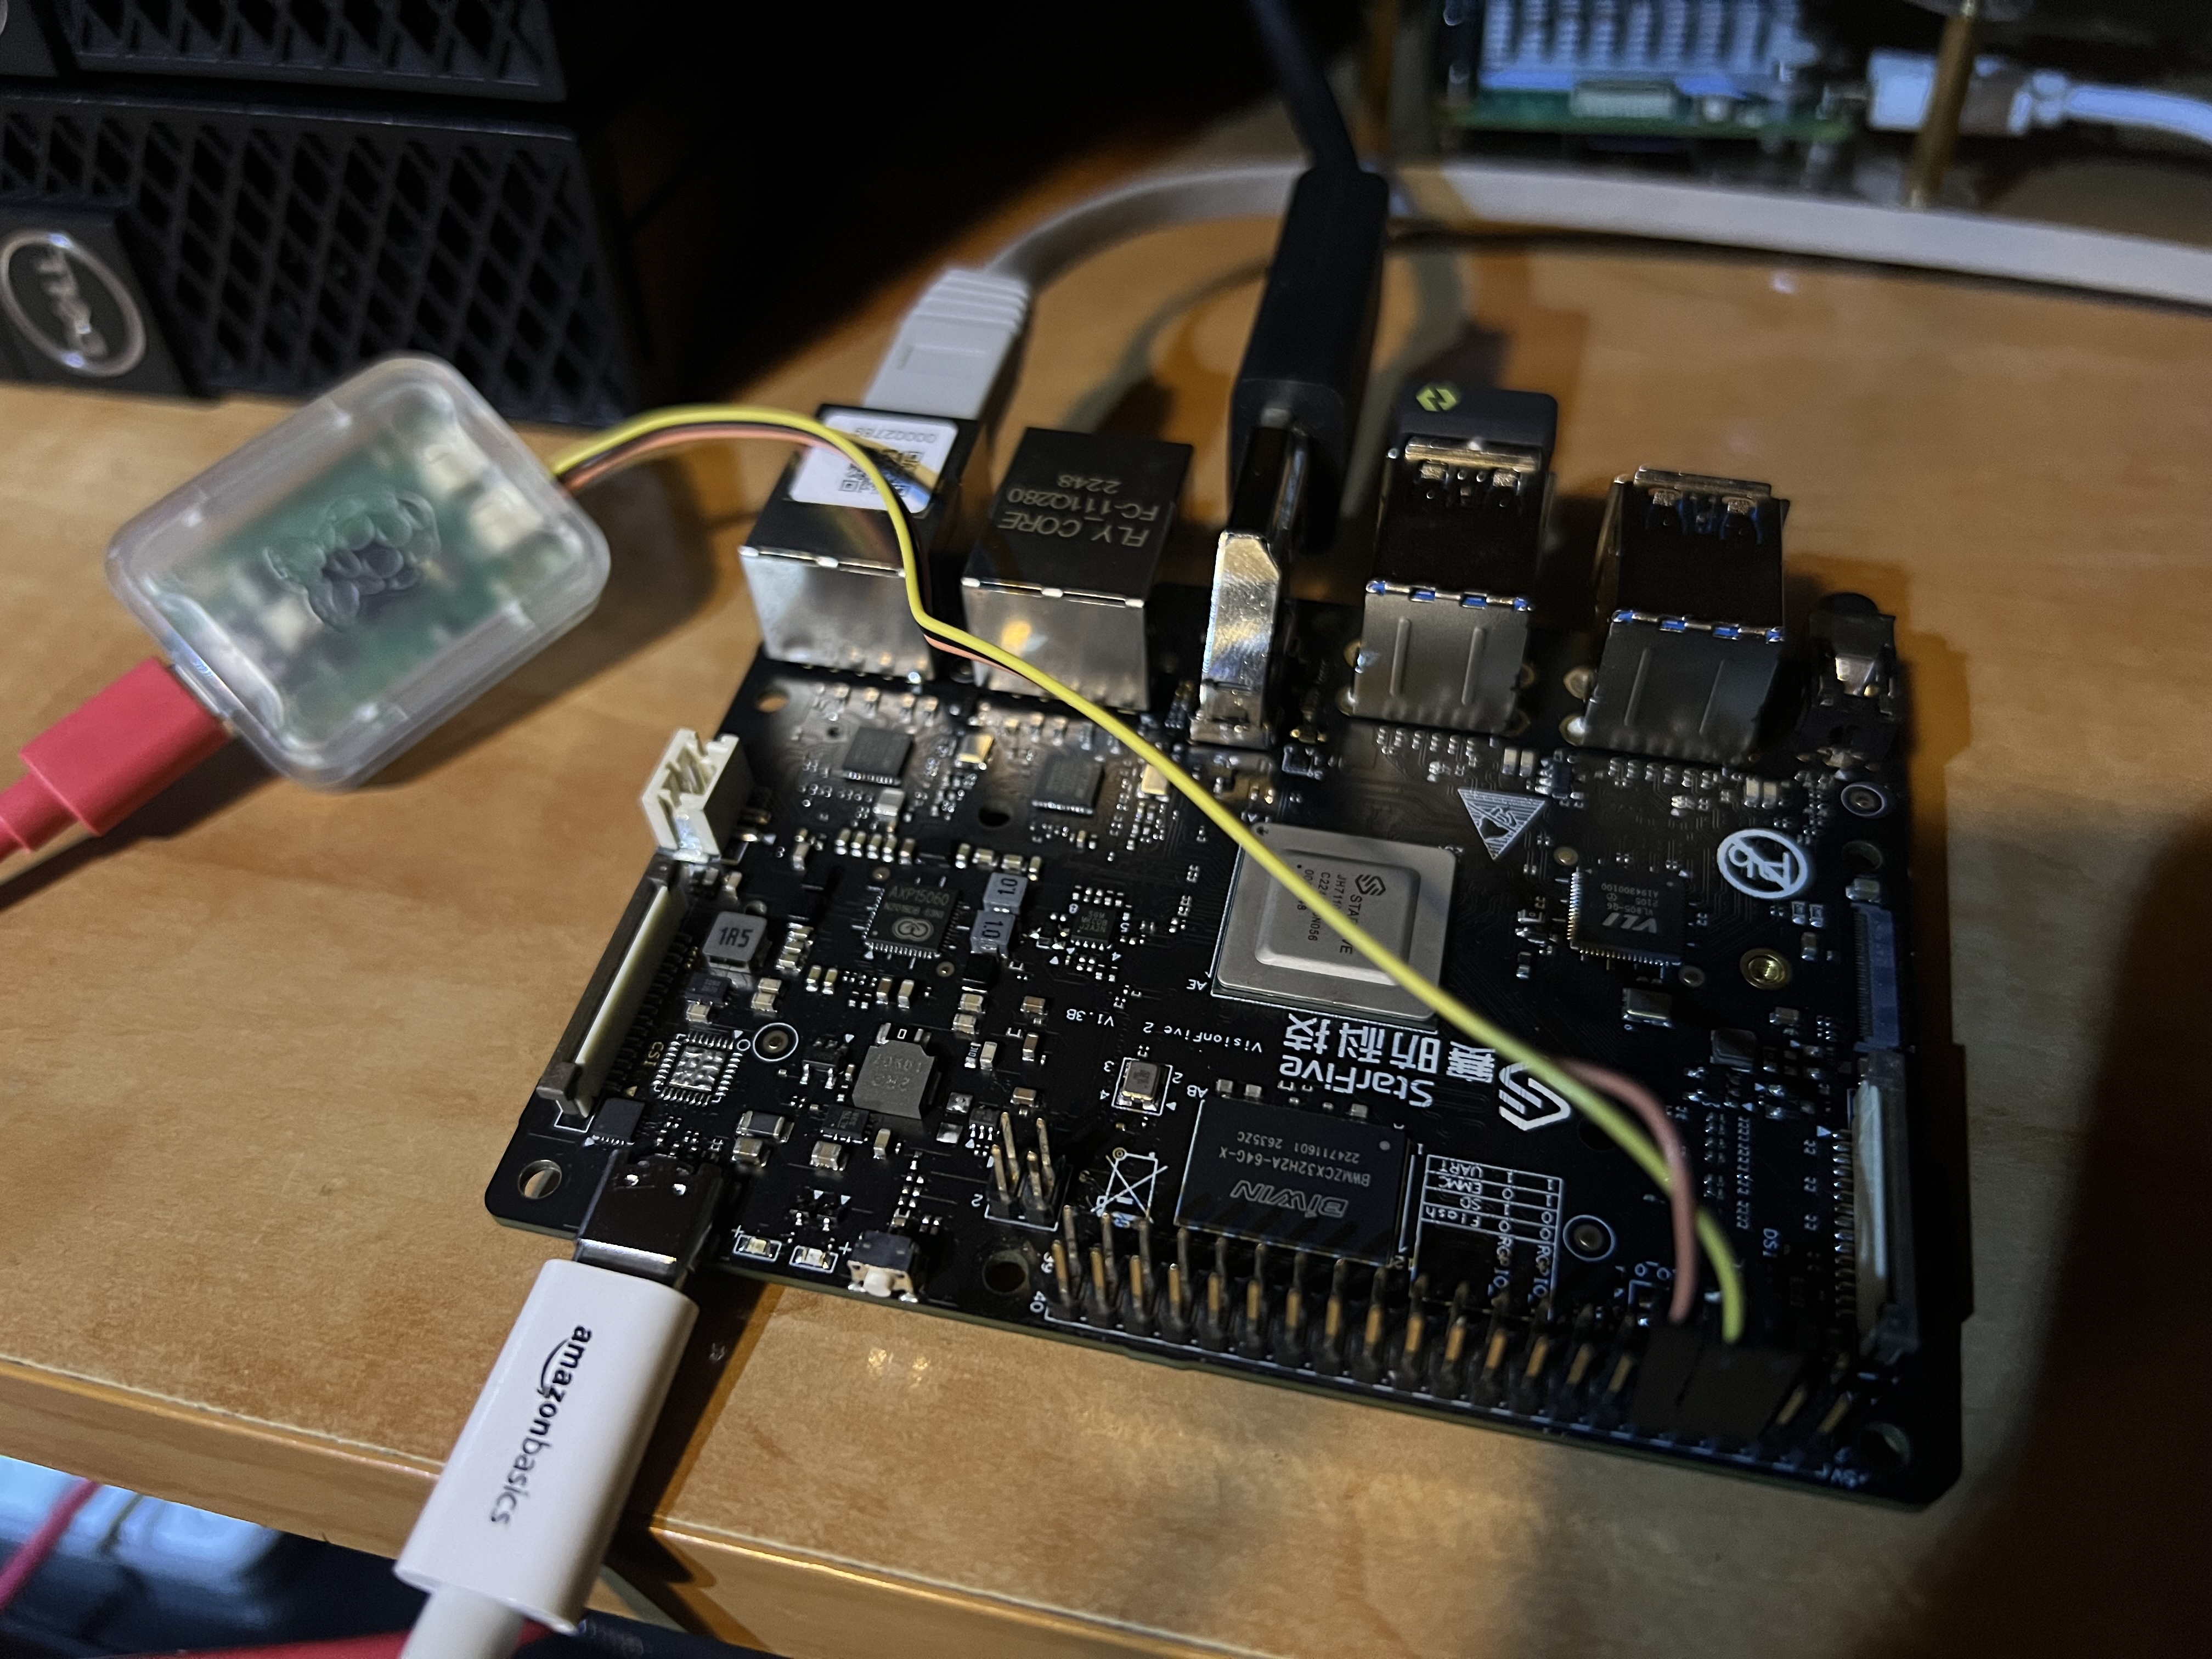
Install the MicroSD card you flashed earlier, plug the USB drive into any of the USB ports and ensure you have either an Ethernet network connection (for SSH) or HDMI and keyboard and mouse available.
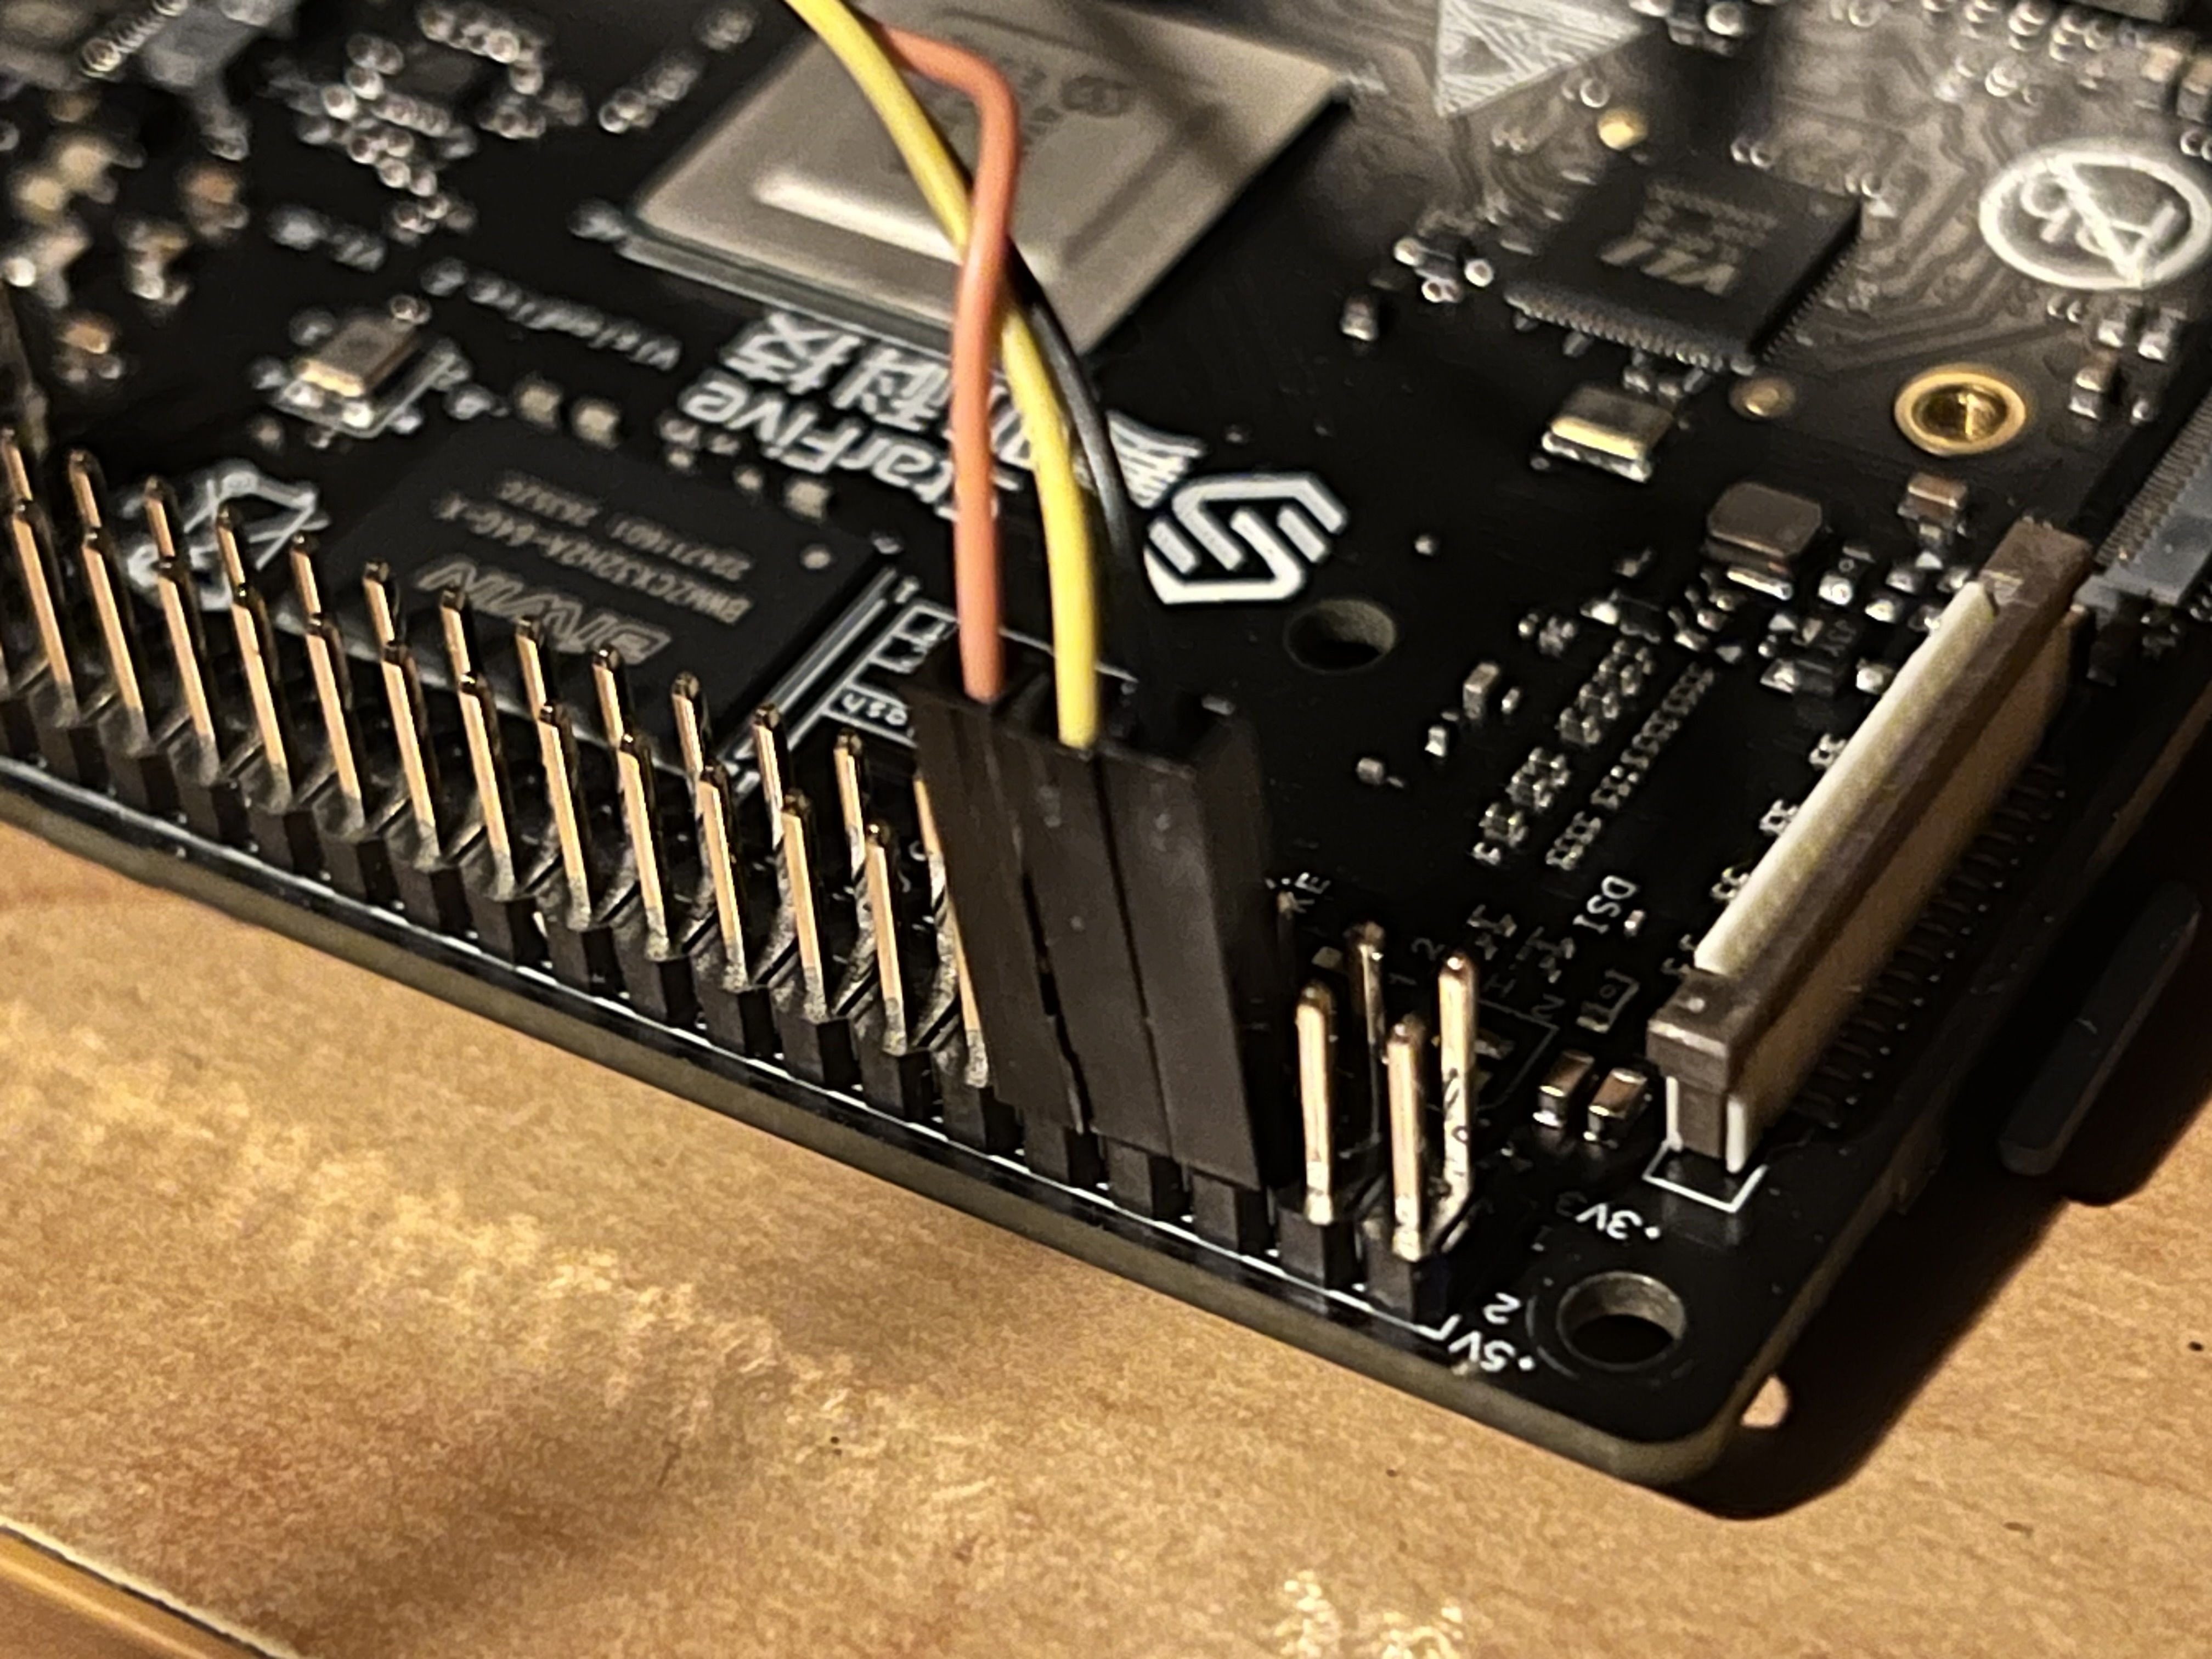
Optionally, if you intend to use Ubuntu later, then you will need to set up the USB to UART device using the GPIO pins. I am using the rather handy Raspberry Pi Debug Probe for this. The leads need to be connected from the board to your UART cable as follows:
Pin 6 ->
GNDPin 8 ->
RXPin 10 ->
TX
🔄 Updating U-Boot and SPL
Power on the board and let it run through the boot process fully. This can take some time, but just let it run until you get a prompt. To run the commands following commands, you can either enter them directly or use SSH.
If you hit the dreaded mipi_0p9: disabling hang during the boot, you will need to SSH into the board as it is likely you are using a 4K monitor, which has been known to cause some issues. The username and password you need are root and starfive.
Next, we need to mount the USB drive so we can access the files. This is required as the image we are using right now is so minimal that it does not include any tools that will let us download the files or even a way to install them.
List the available disks with the lsblk command:
# lsblk
NAME        MAJ:MIN RM   SIZE RO TYPE MOUNTPOINTS
sda           8:0    1   116G  0 disk
|-sda1        8:1    1   200M  0 part
`-sda2        8:2    1 115.8G  0 part
In this case, sda2 is the drive and partition we need. Now we can mount the drive and access the files with:
mkdir usb
mount /dev/sda2 usb
Next, we need to list the MTD devices so we can be sure we are flashing the correct firmware to the correct device:
# cat /proc/mtd
dev:    size   erasesize  name
mtd0: 00040000 00001000 "spl"
mtd1: 00010000 00001000 "uboot-env"
mtd2: 00300000 00001000 "uboot"
mtd3: 00100000 00001000 "data"
In this case, we need to flash the SPL firmware to mtd0 and the U-Boot firmware to mtd2. This is done using the flashcp command and providing the files from the USB drive:
⚠️ Ensure you choose the correct device! ⚠️
cd usb
flashcp -v u-boot-spl.bin.normal.out /dev/mtd0
flashcp -v visionfive2_fw_payload.img /dev/mtd2
You should see output along the following lines if successful:
# cd usb
# flashcp -v u-boot-spl.bin.normal.out /dev/mtd0
Erasing blocks: 36/36 (100%)
Writing data: 143k/143k (100%)
Verifying data: 143k/143k (100%)
# flashcp -v visionfive2_fw_payload.img /dev/mtd2
Erasing blocks: 736/736 (100%)
Writing data: 2943k/2943k (100%)
Verifying data: 2943k/2943k (100%)
Now shut down the board and you are done updating the firmware!
👷 Preparing for Ubuntu
If you want to run Ubuntu, there is an extra step and this is where the USB to UART bridge is required. After flashing the latest firmware, we need to reset the U-Boot environment variables to default values, otherwise, the installer/image will not boot.
To access the U-Boot console, you can use picocom. On macOS this can be installed with brew install picocom.
Next, find the USB to UART bridge device and connect to it. On macOS for example, these devices usually appear as tty.usbmodem devices, so look for it with the following command:
ls /dev | grep tty.usb
Then connect to it:
sudo picocom -b 115200 /dev/tty.usbmodem2112402
You should be greeted with Terminal ready if this was successful.
Next, power on the VisionFive 2 board. You will see a large amount of output, but for a few seconds you will have the chance to interrupt the boot process to allow us to drop into the U-Boot console:
Hit any key to stop autoboot: 2
Now you need to run the following commands:
env default -f -a
env save
The output should look like this:
StarFive # env default -f -a
## Resetting to default environment
StarFive # env save
Saving Environment to SPIFlash...
Erasing SPI flash...
Writing to SPI flash...
done
OK
Shut down the board again and now you are prepared to run Ubuntu on your StarFive VisionFive 2 board! 🎉
📌 Round Up
Now your StarFive VisionFive 2 board is fully updated and ready to run the latest operating systems! While the process is not very obvious from the official documentation, it is overall fairly simple once you get the hang of it. So, next time you need to update your board, simply follow the same steps as before and you will be up and running in no time.
For the next steps on running Ubuntu, visit the Ubuntu Documentation to find out the different options for getting going with Ubuntu on this board.
Have fun!